
Video files are inherently large, and it is often necessary to transcode videos so they are more suitable for online streaming or sharing. For edTPA requirements, each video submitted must be no larger than 500 MB. This document describes ways to export existing videos on a computer to reduce their overall file size.
Using HandBrake to Transcode Video
HandBrake is a free, cross-platform video transcoding tool that can be downloaded from https://handbrake.fr/. HandBrake can be used to convert DVD content into video files, or as a video conversion (transcoding) tool.
The screen images below are from macOS, but the interface is nearly identical on the Windows and Linux platforms.
1) Start the HandBrake application, then Choose the source location of the video file you would like to load into HandBrake.
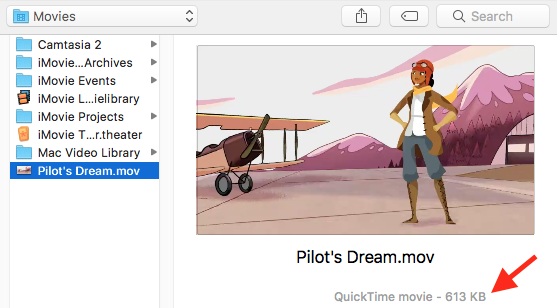
Notice that when you select the video file you can see the current type and size of the video beneath the thumbnail image in the window.
2) Once you open a video you will see options within the interface that allow you to change various aspects of the video. To simplify the choice of settings there are presets listed in the presets panel on the right side of the main window. Choose a preset by clicking one of the listed settings.

For most videos the Fast 720p30 setting is a good preset to begin with. If that preset results in a file that is too large, try using the Fast 480p30 setting by clicking it in the list.
3) Click the Browse… button and choose a destination path where the transcoded video file will be saved.

4) Click the Start button to begin the transcoding process.
![]()
When the transcoding process is finished, the lower left corner of the HandBrake window will indicate Encode Complete. The transcoded video file will be available at the file path location you specified in Step 3 above.
Using iMovie to Transcode Video
1) Import the video file you would like to optimize into iMovie and edit or trim the video as needed.
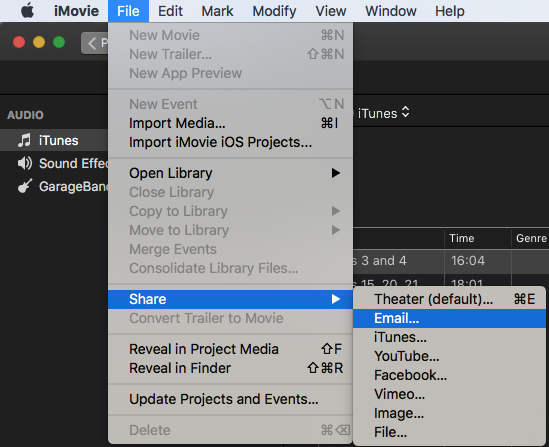
2) Go to File -> Share -> Email. Of all of the Share options, the Email share settings will produce the smallest file size.
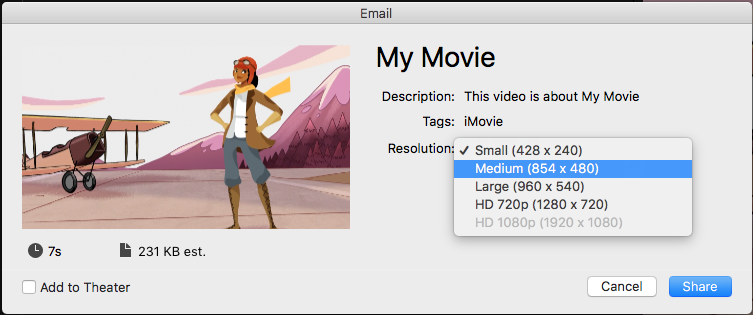
3) The Email share settings include 5 resolution presets, ranging from Small to HD 1080p. Medium is a good setting to start with. Note that the estimated size of the video will be shown below the thumbnail of the video, near the lower left area of the window. If you are preparing a video to upload to edTPA, you can use the estimated file size to help you select the best quality setting that fits within the 200 MB per file upload limit.
4) With the desired resolution selected, click the Share button.
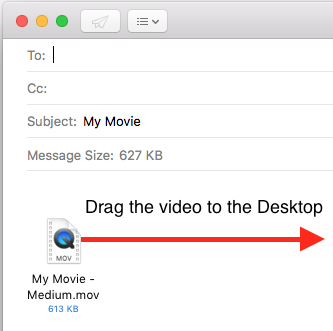
The file will begin the rendering process, which may take several minutes or longer, depending on the original quality and size of the source video. Because of the way the Email setting in iMovie works, the software assumes you want to use Apple Mail to email the video, so it opens a draft email in Apple Mail, with the video file attached.
5) Drag the optimized video from the Apple Mail email window to your computer desktop.
The video file can now be copied or uploaded.