
Installing the Network File Share Software on a Chromebook
1) Once signed in and connected to a Wi-Fi network, click the Launcher tool in the lower left corner of the screen.
![]()
2) Click the Web Store icon. Alternatively, you can search for “chrome web store“.
![]()
3) In the store, search for “Network File Share for Chrome OS“, or click this link, then click the Add to Chrome button.
Configuring the Network File Share Software
Note: In order to connect to a UO network file share you must be connected to the UO VPN first.
1) Click the Launcher tool.
![]()
2) Open a new Tab and click the “All Apps” button.
![]()
3) Look for the Network File share icon and open it.
4) Next, you will need to enter the connection information that includes the share path, as well as your UO Duck ID credentials.
The “Share Path” will depend on what file share you are connecting to. In most cases, the first part of your connection path will begin with
smb://
If you are connecting to one of the more common “files” server shares, make sure to use the fully qualified domain name of “files.uoregon.edu” in the share path, as shown in the example below.
If you have a question about the file path to use for the connection, please submit a support ticket.
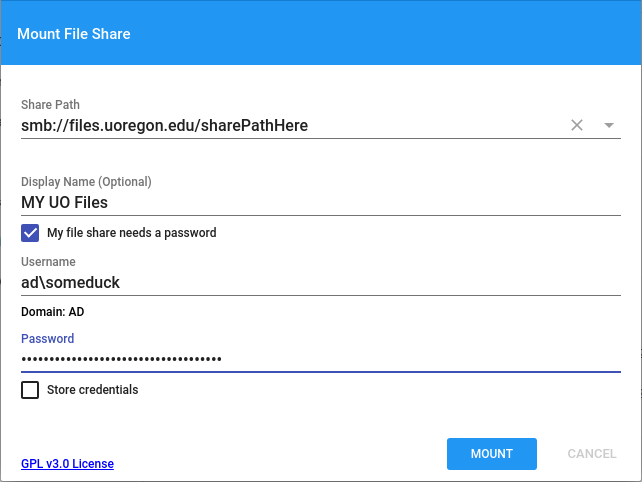
Your username needs to be prefixed with ad\, then your UO Duck ID, as shown for the user named ‘someduck’ in the example above.
When all information for the file share has been entered, click the Mount button. It may take a few moments for the file share to mount, but the screen will disappear when it has established a connection to the share.
Viewing the Network File Share
1) To view the file share click the Launcher tool in the lower left corner of the screen.
![]()
![]()
3) You should see a window showing various file and server locations you can access. Click the item to view from the listing on the left side of the window.
![]()
You will then be able to access files in that network share.
You can repeat the steps shown in the “Configuring the Network File Share Software” above to add additional shares.